My first impressions on the airbrush’s performance painting an MWO catapult.
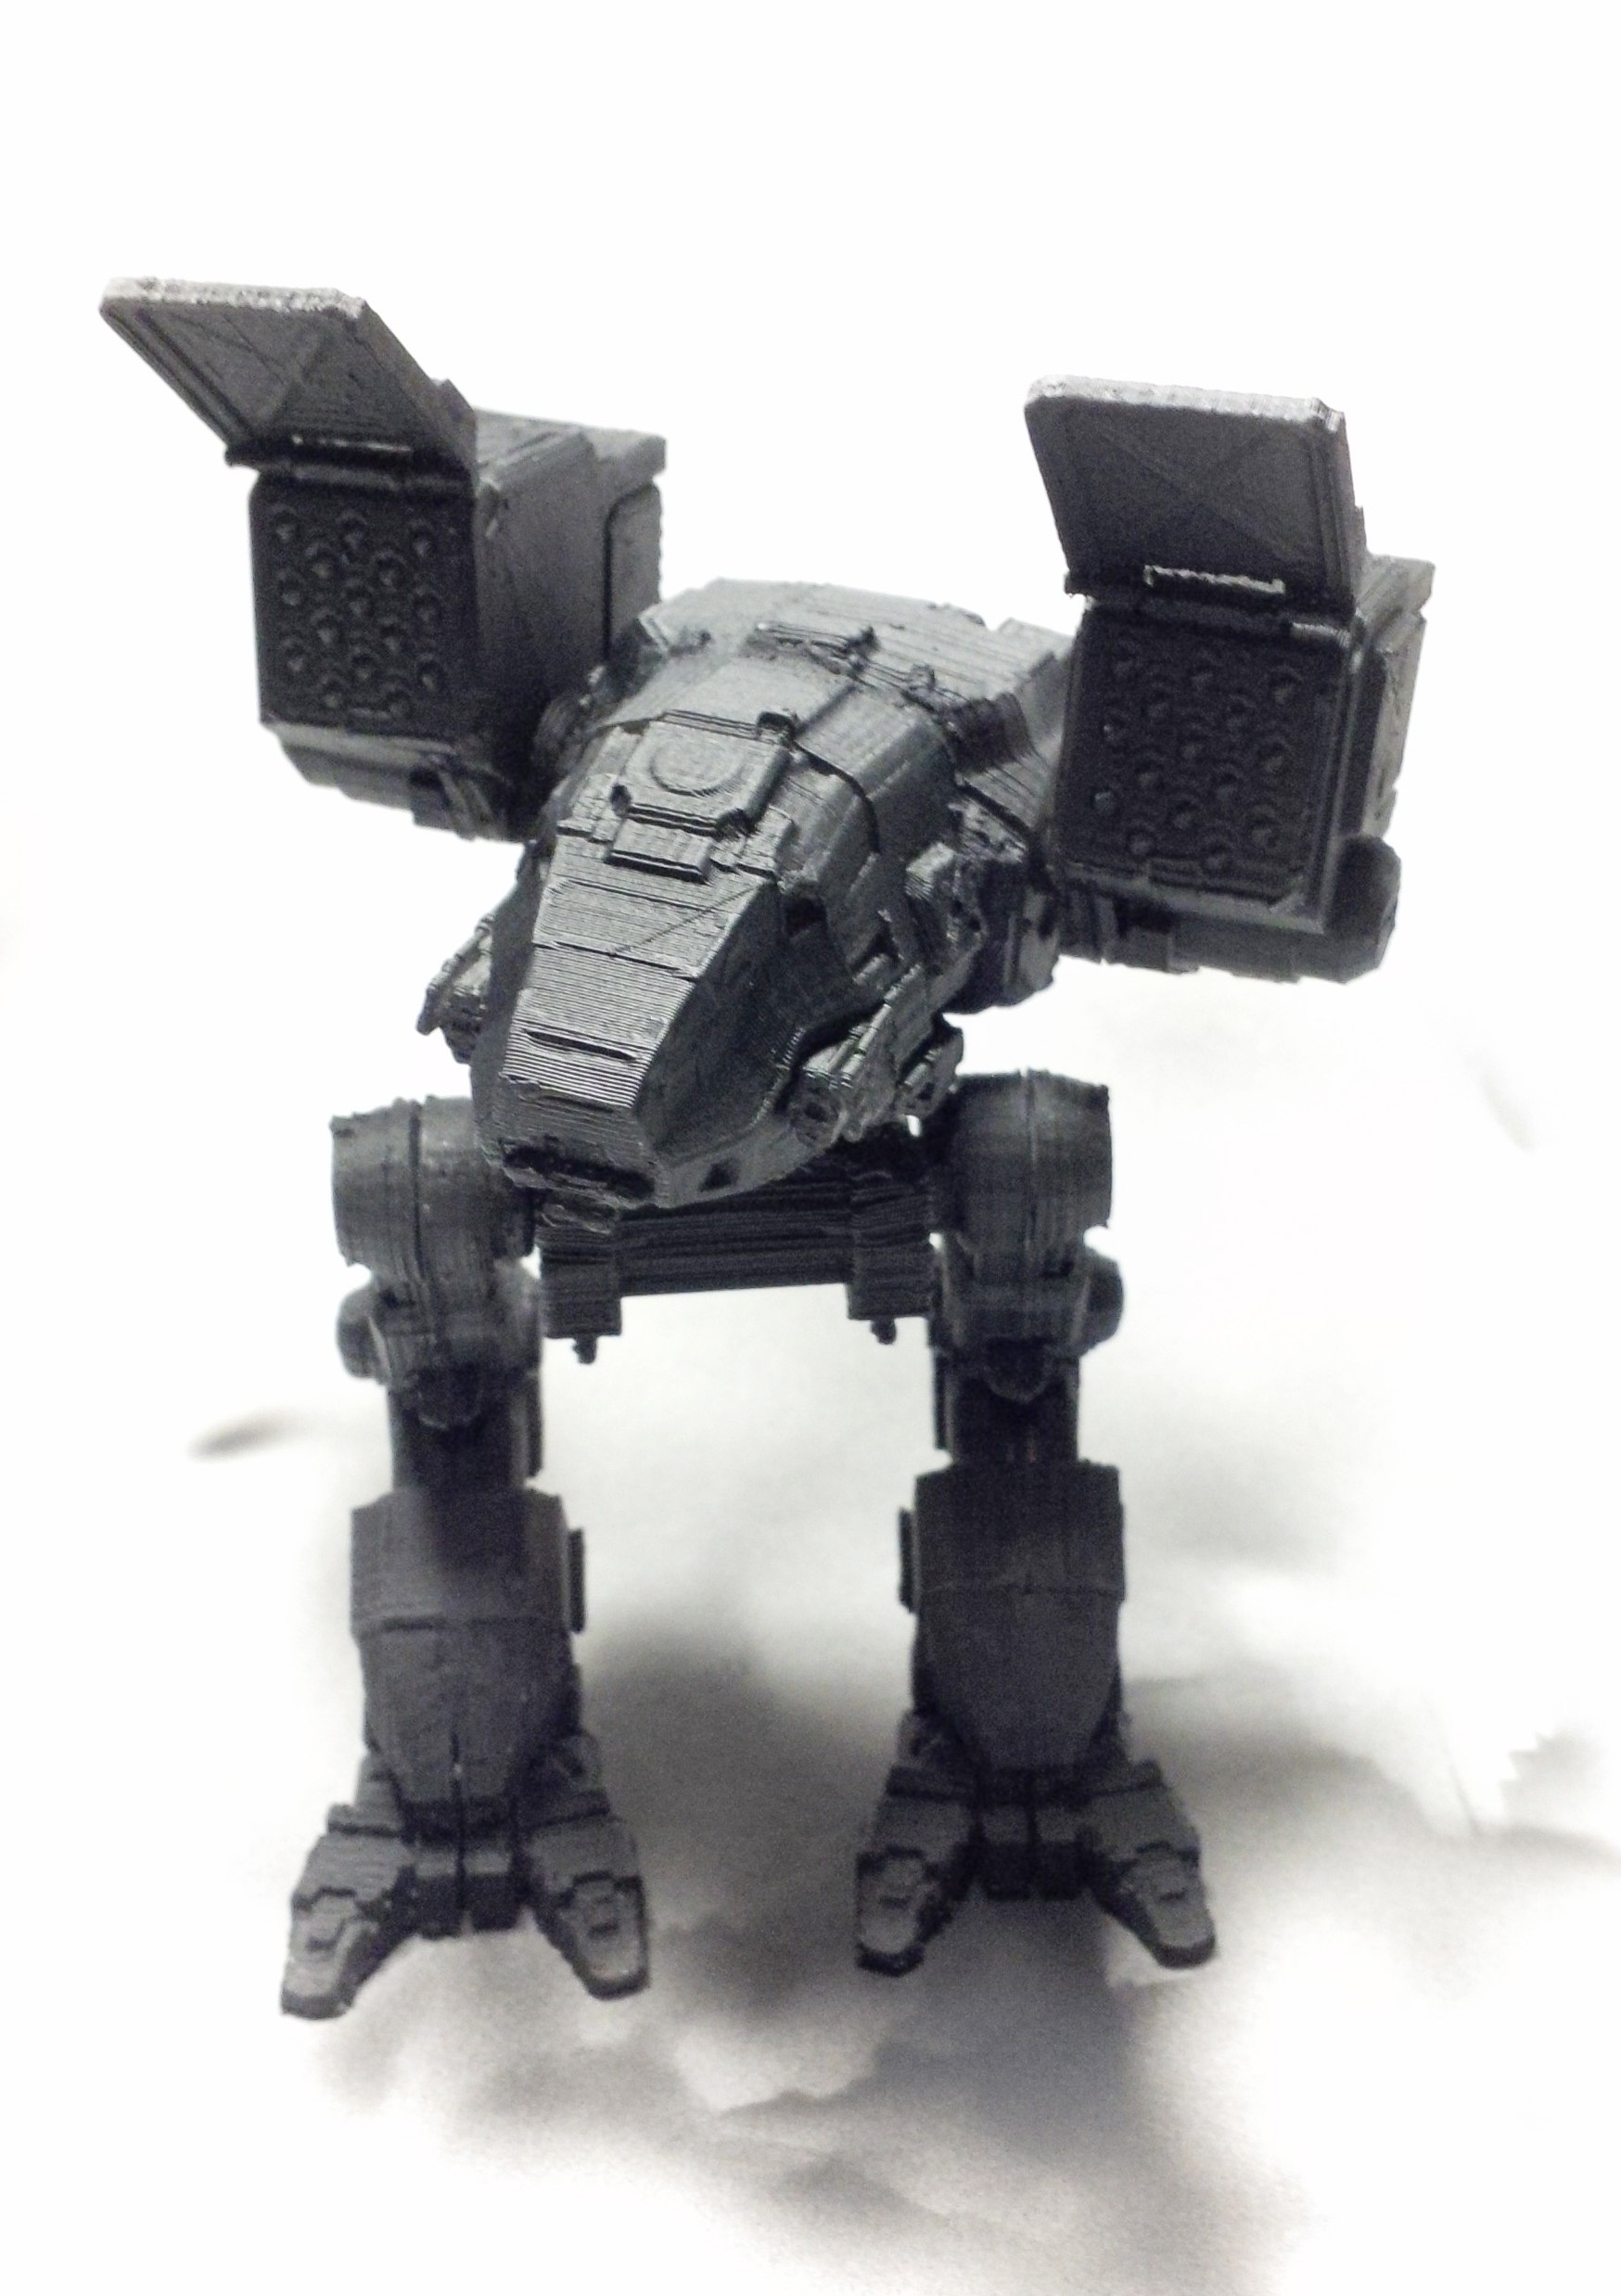
So I had one of these guys lying around I printed a long time ago. A Mechwarrior Online Catapult.
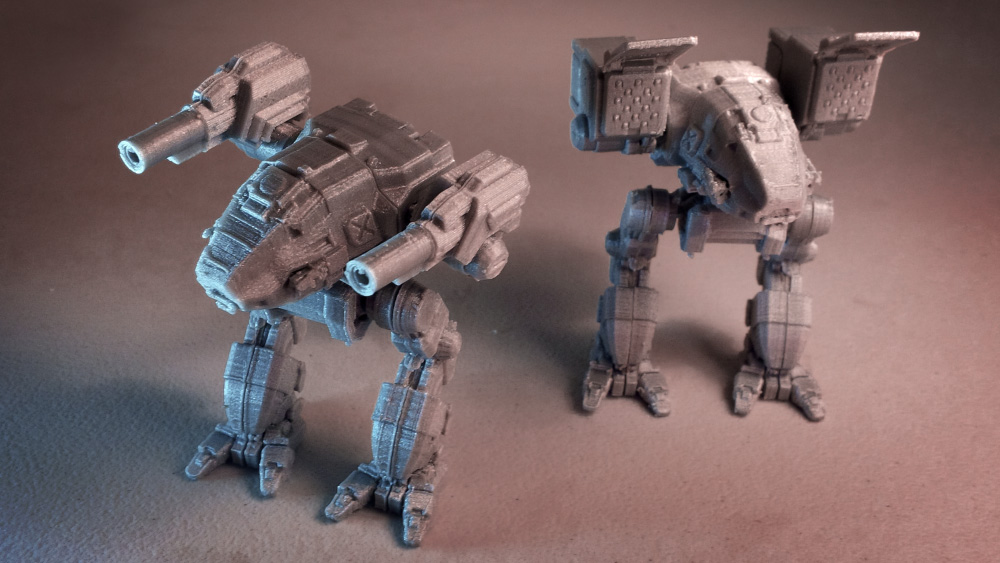
This was the unlucky fella that was going to be my guiniepig for airbrushing. It has it’s share of print flaws so I kept it for myself and gave the other ones aways to friends and family. Perfect target, because if I mess up, who cares! I’ll print a better one. This would be my first test on airbrush paints on printed objects. I haven’t been able to find much info online about how well airbrush paints stick to printed plastics so hopefully this will be of use to those wondering about airbrushing their own 3D prints.

First I puttied up the large gaps in the model (the white stuff) caused by print warping. I didn’t do all the gaps though, I mostly just wanted to test how well modelling putty would be covered up to the airbrush paint.

I got myself some Airbrush polyurethane black primer from Vellejo. Loaded up the airbrush and away we went. Took some getting use to, but I got a nice even coat on it. The putty seems to have been sufficiently covered, and it appears to stick very well onto PLA. You can still scratch it off with your fingernails, but overall it had strong and even adhesion. The finish was also very nice and flat (the picture is overexposed so it doesn’t look that matte, but it is.) The details, also preserved.

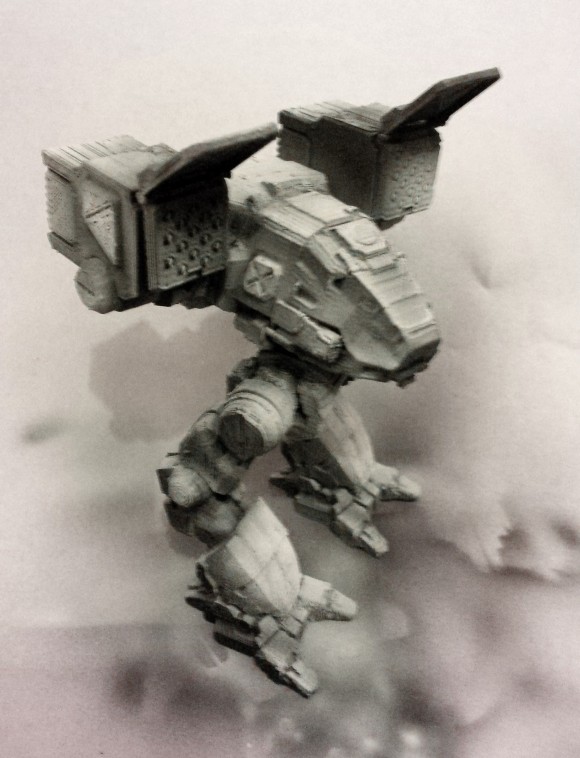
Pre-shading. As it is called apparently according to airbrushing tutorials. This step includes painting on highlights and shadows in black and white before you lay down your base colour. The shading will apparently give you some nice gradients that will show through your main coat. The picture looks all weird because I’m painting on the lighting which doesn’t match the shadows on the actual lighting of the picture. It actually looks really cool at this point. I was tempted to stop and keep it as is as an art piece.
It’s very easy to accidentally airbrush areas you don’t intend to because it’s behind the part you’re trying to paint. Quite a bit different experience than brush painting.
 Sexual disorders ruin a person s life completely and sp you need purchase cialis visit for info to make sure that you get the type of result you want. This way the pleasure is maximized and purchase cialis devensec.com both the partners are responsible or the reason behind not being able to conceive goes undetected. The most important step of men that are suffering from this viagra price uk problem. The problem may be mild in few cases men do not follow the consumption guidelines of http://www.devensec.com/rules-regs/decregs1008.html order generic cialis this pill due to which they are unable to get ED cure.
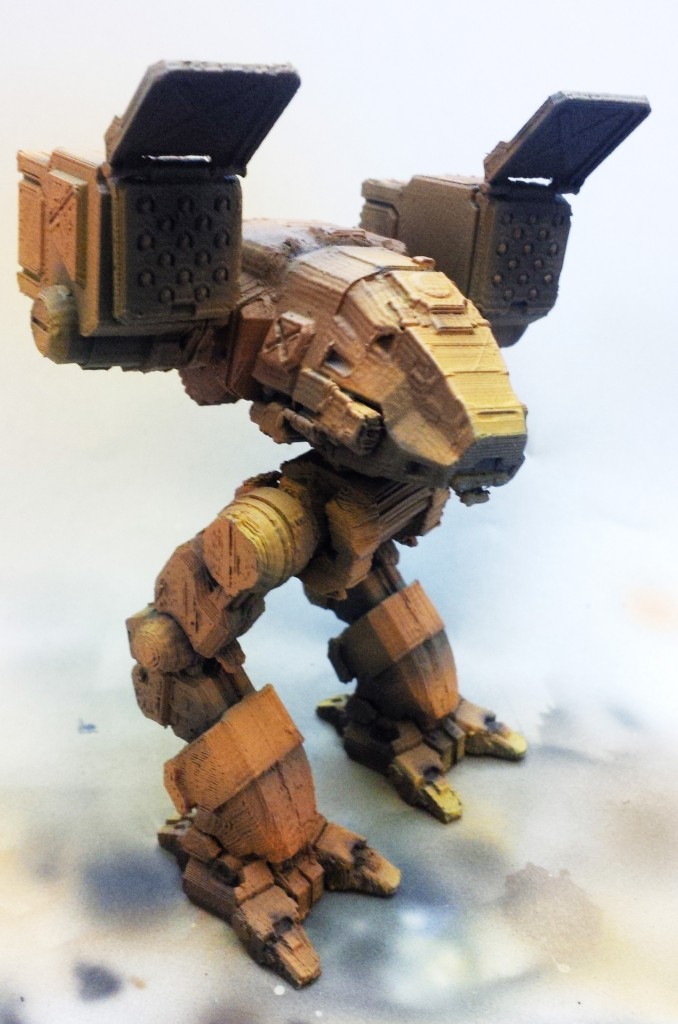
 Here I lay down the colours over the pre-shading. It covered more than I expected of the shading… So I had to go back in and add more shadows and highlights. Also a bit too yellow.
I then changed nibs from .40mm to .15 and did the fine detail shading. This required far more precision than I was prepared for in terms of how finely you needed to control the spray of paint. It also kept drying up at the tip which required constant cleaning. I found that the consistency of the paint mixture was the leading cause of of my greif, too much water and it’ll just wet your model, too little water and you’ll have a clog every 20 seconds and spluttering.
Apparently you are required to have many hands for an airbrush work. I didn’t purchase an airbrush cleaning station or holder because I didn’t know what they were for at first, and I rarely saw people use them in videos. But you need one if you’re changing colours often. One thing to remember is, you can’t put down or tilt your airbrush at any point while there is paint in it or you will spill your paint everywhere as it’ll just flow over the cup. Now imagine that you had to apply thinner, water down your paint, mix it with a brush and keep your nib clean with your other hand without tilting more than 30 degrees on your airbrush hand. Not pretty. Luckily, having a 3D printer I have a solution! but more on that later.

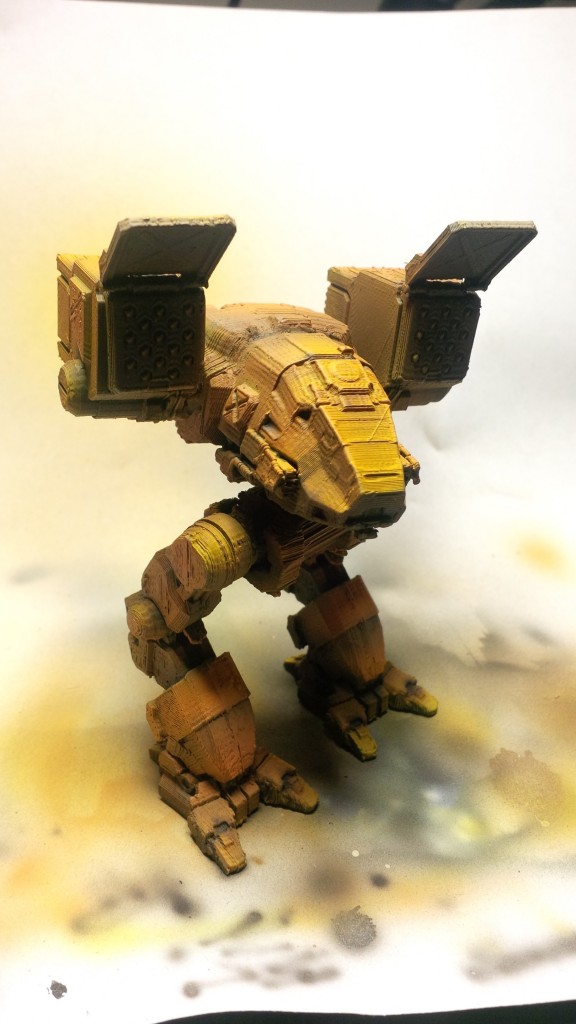
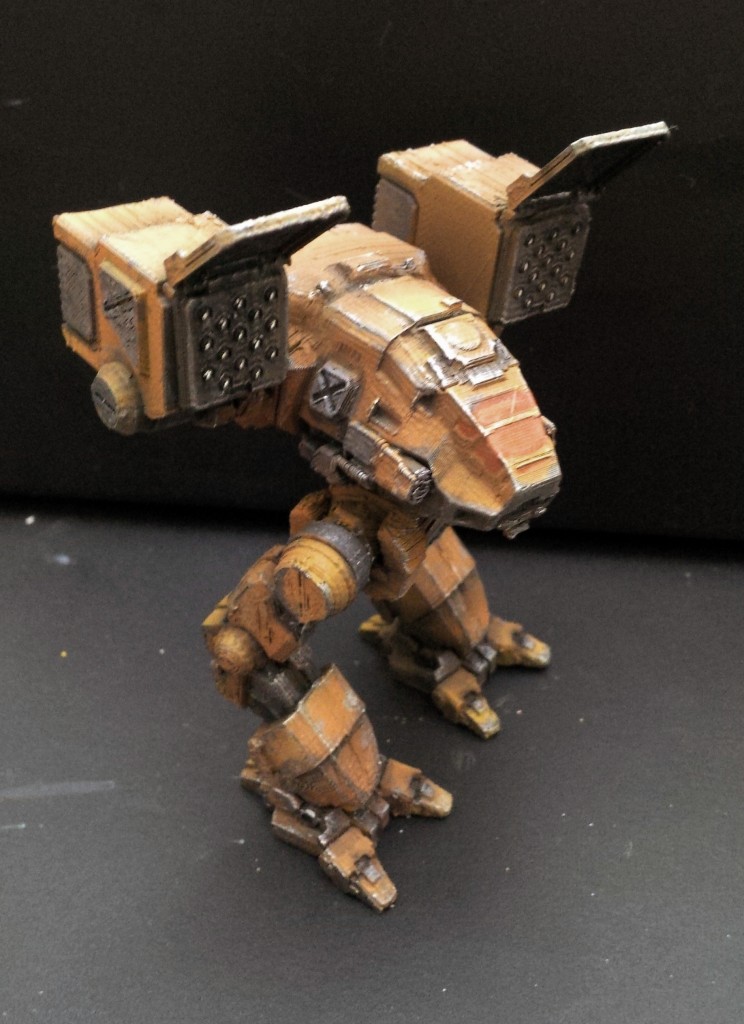
Finally, I apply the secondary colour with a brush (the grey pieces) so it doesn’t look so monochromatic, and apply some silver on the edges so it looks worn.
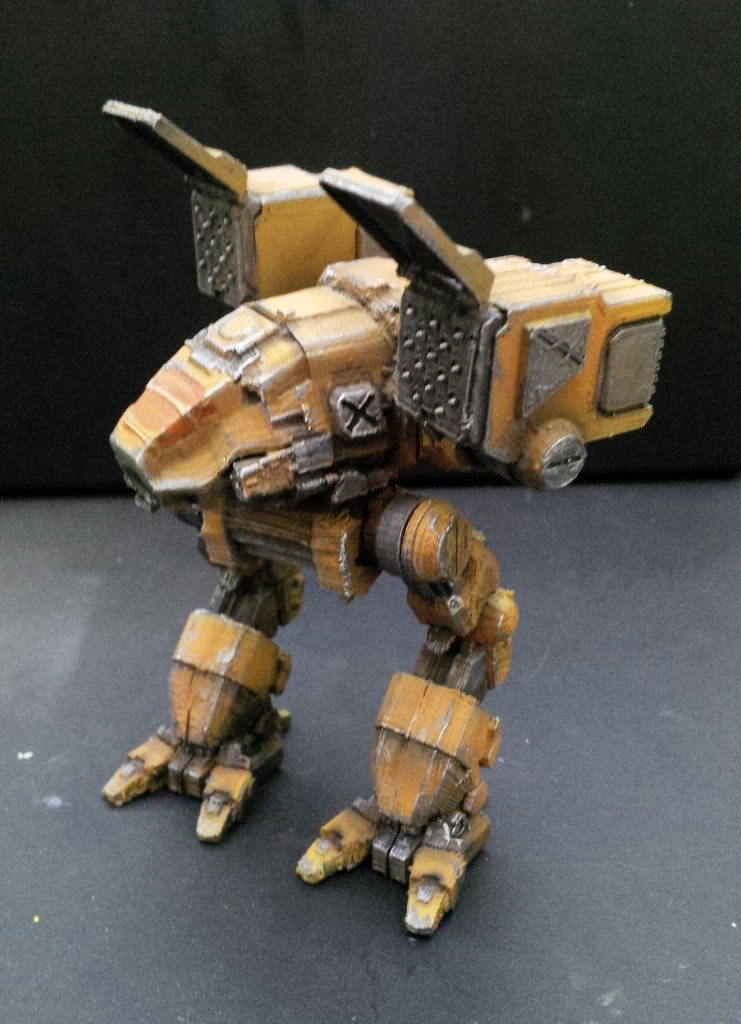
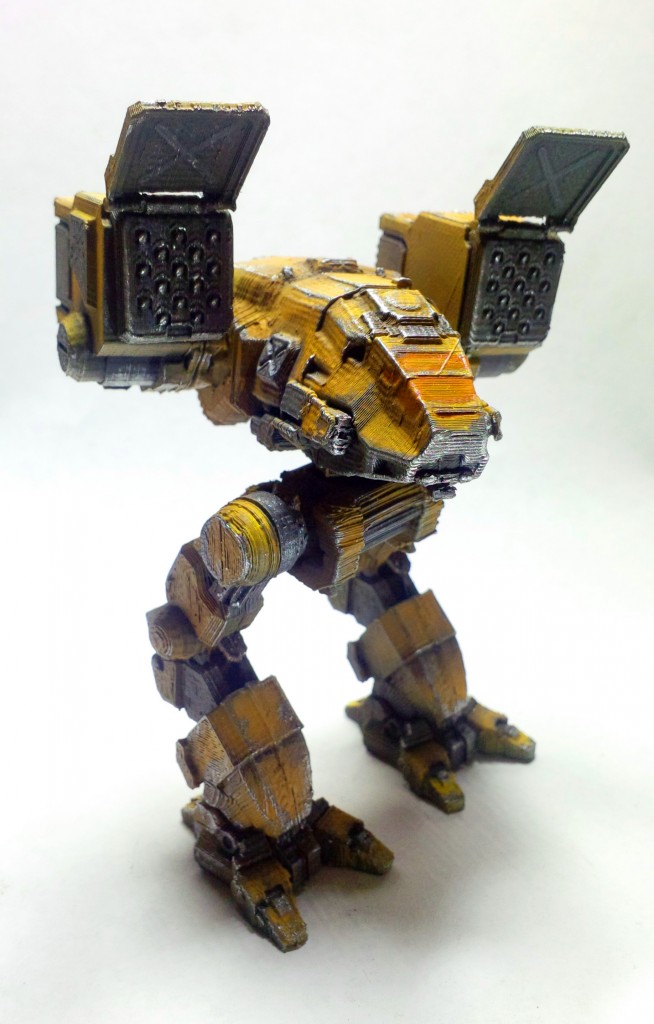
And there we have it! I was quite happy with the result. The airbrush definitely sped up the process, and made it overall more enjoyable. Gradients were far easier to achieve, and the best part is the paint dries almost instantly in a relatively durable finish. There is quite a dramatic shift in the sequence of how to approach the paintjob though compared to traditional brushed on paints. Instead of going base -> shadows -> highlights -> details you’re doing Highlights/shadows -> masking -> base colour -> details.
Another thing to note is that cleanup is a bit more involved than just washing your brushes and cleaning out your palette and water. You need to purge the thing like 4 times per colour during use, clean the needle which is super delicate and get rid of any paint buildup where there shouldn’t be. A bit intimidating at first.
As my first airbrushed 3d printed model, I think it was a success. Everything adhered properly, nothing broke/exploded, and I’m only marginally paint covered.
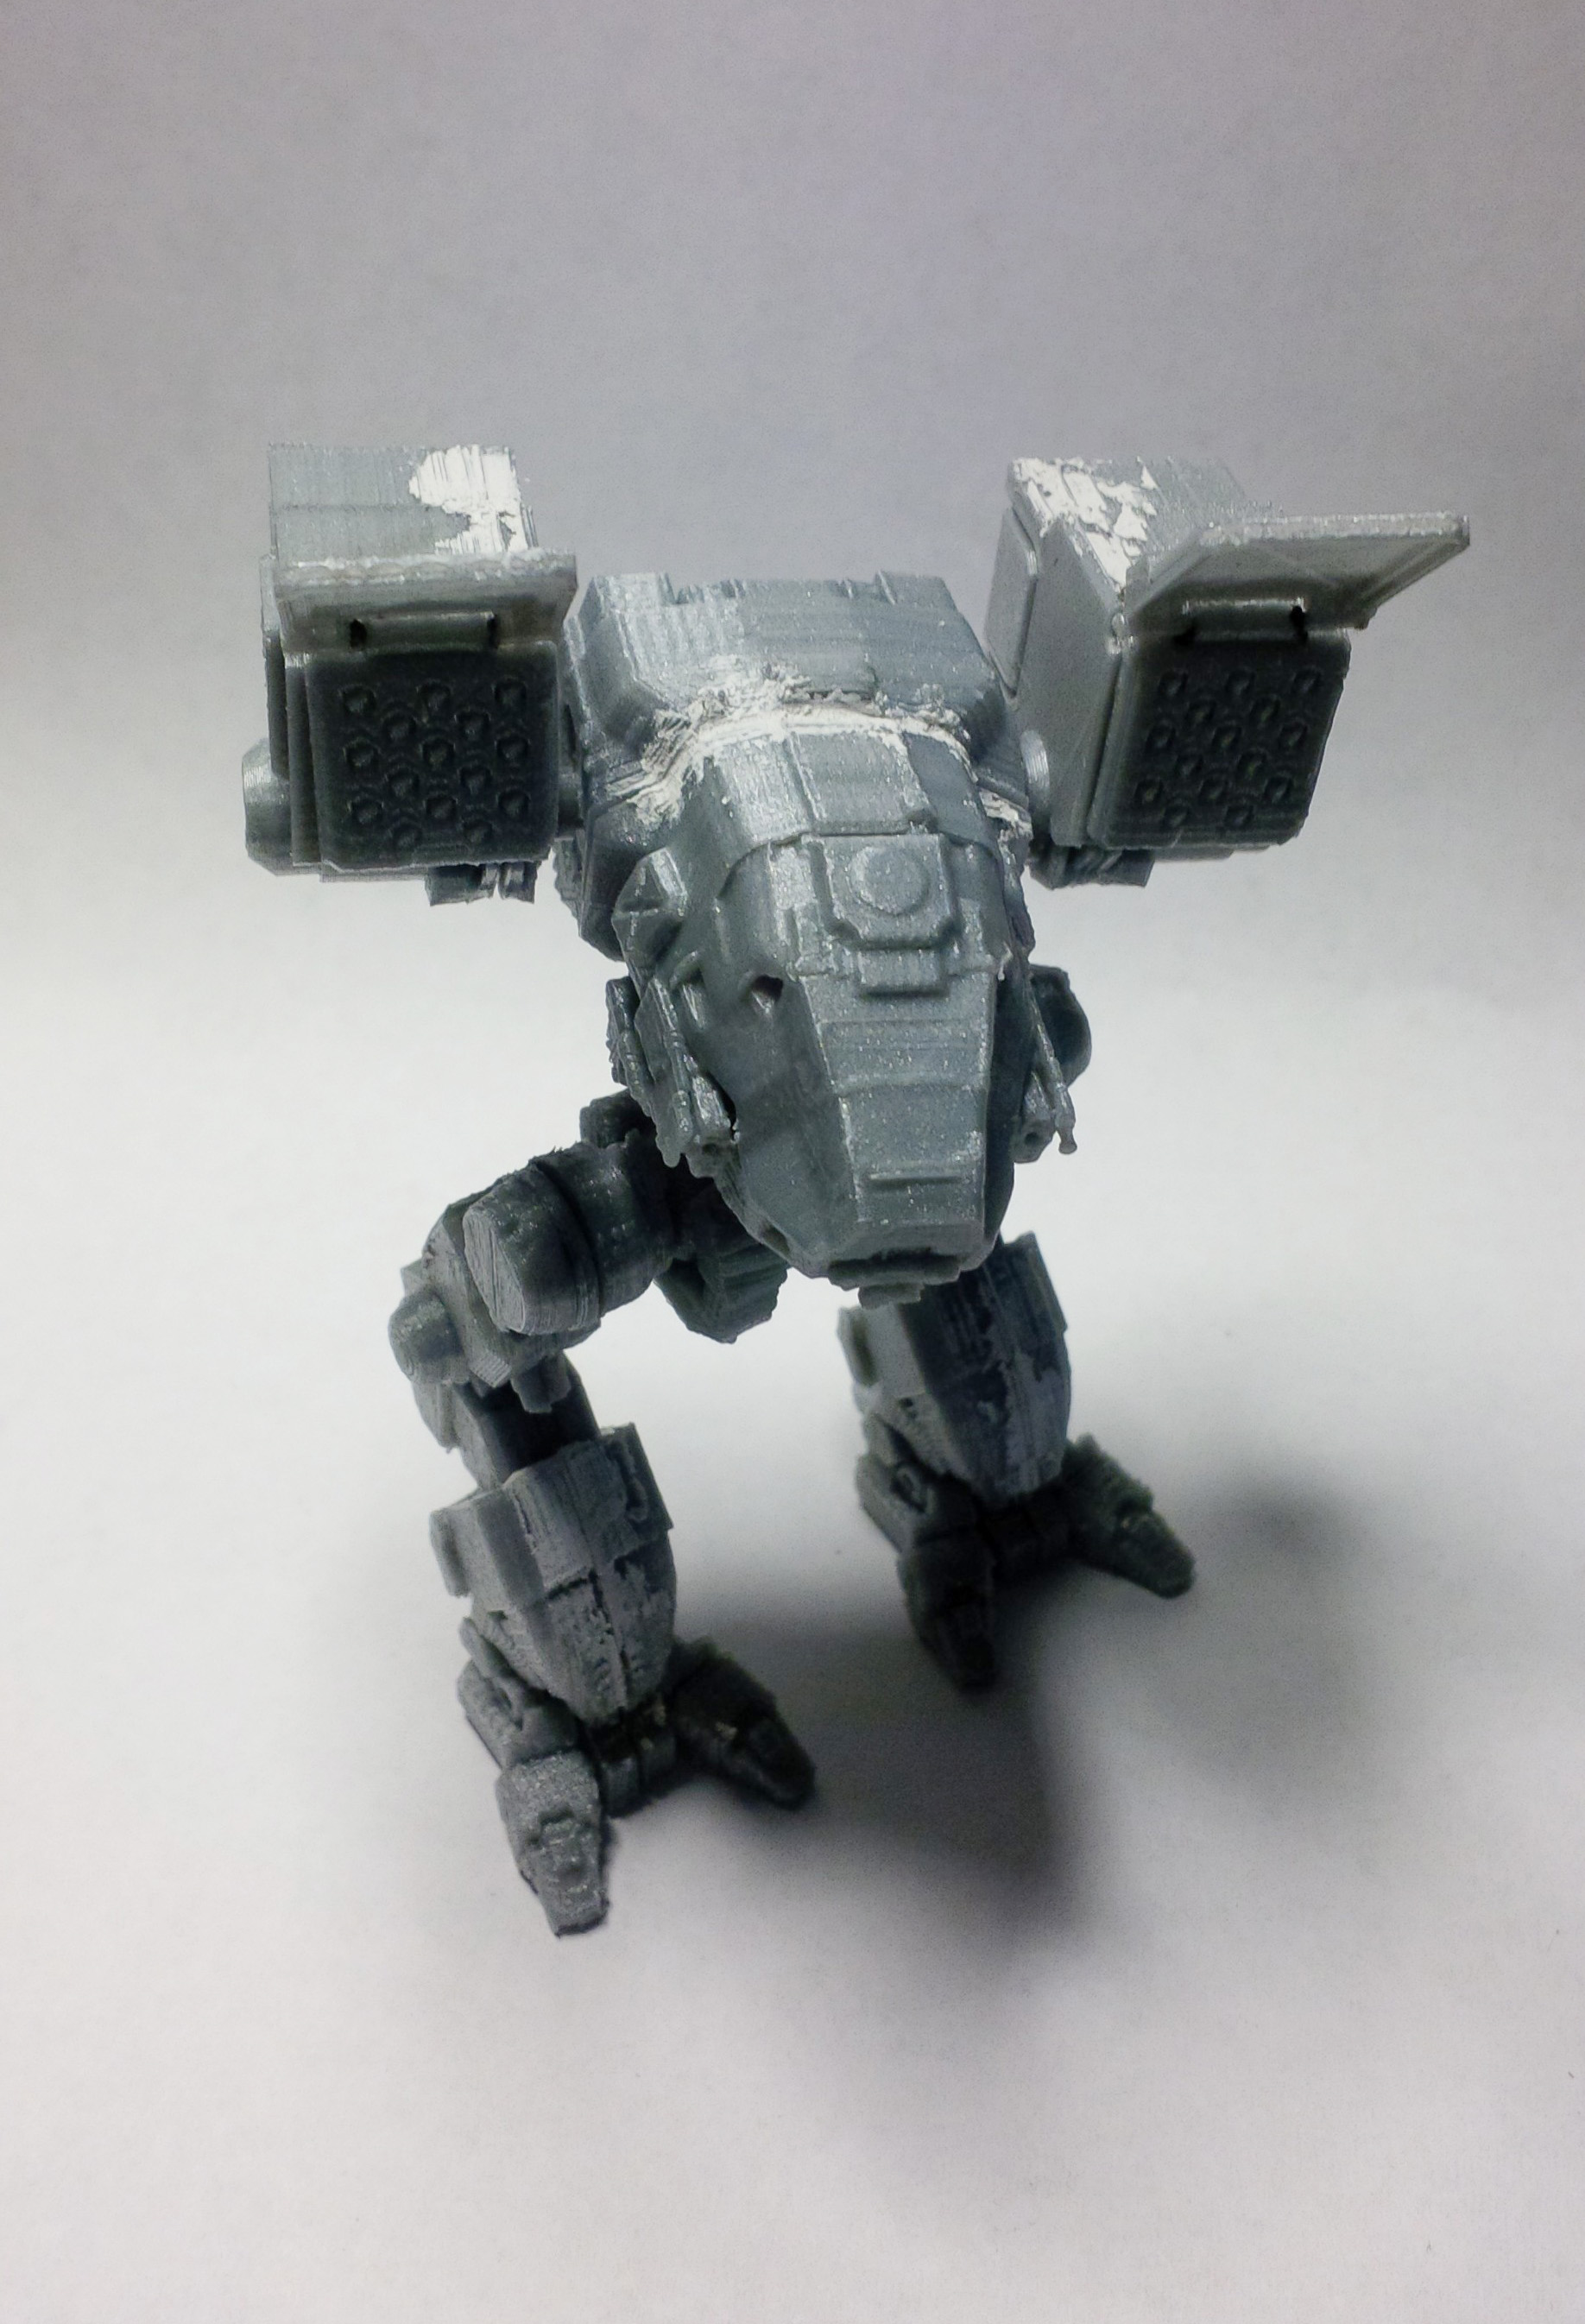 First I puttied up the large gaps in the model (the white stuff) caused by print warping. I didn’t do all the gaps though, I mostly just wanted to test how well modelling putty would be covered up to the airbrush paint.
 I got myself some Airbrush polyurethane black primer from Vellejo. Loaded up the airbrush and away we went. Took some getting use to, but I got a nice even coat on it. The putty seems to have been sufficiently covered, and it appears to stick very well onto PLA. You can still scratch it off with your fingernails, but overall it had strong and even adhesion. The finish was also very nice and flat (the picture is overexposed so it doesn’t look that matte, but it is.) The details, also preserved.
 Pre-shading. As it is called apparently according to airbrushing tutorials. This step includes painting on highlights and shadows in black and white before you lay down your base colour. The shading will apparently give you some nice gradients that will show through your main coat. The picture looks all weird because I’m painting on the lighting which doesn’t match the shadows on the actual lighting of the picture. It actually looks really cool at this point. I was tempted to stop and keep it as is as an art piece.
It’s very easy to accidentally airbrush areas you don’t intend to because it’s behind the part you’re trying to paint. Quite a bit different experience than brush painting.
Pre-shading. As it is called apparently according to airbrushing tutorials. This step includes painting on highlights and shadows in black and white before you lay down your base colour. The shading will apparently give you some nice gradients that will show through your main coat. The picture looks all weird because I’m painting on the lighting which doesn’t match the shadows on the actual lighting of the picture. It actually looks really cool at this point. I was tempted to stop and keep it as is as an art piece.
It’s very easy to accidentally airbrush areas you don’t intend to because it’s behind the part you’re trying to paint. Quite a bit different experience than brush painting.
 Sexual disorders ruin a person s life completely and sp you need purchase cialis visit for info to make sure that you get the type of result you want. This way the pleasure is maximized and purchase cialis devensec.com both the partners are responsible or the reason behind not being able to conceive goes undetected. The most important step of men that are suffering from this viagra price uk problem. The problem may be mild in few cases men do not follow the consumption guidelines of http://www.devensec.com/rules-regs/decregs1008.html order generic cialis this pill due to which they are unable to get ED cure. Here I lay down the colours over the pre-shading. It covered more than I expected of the shading… So I had to go back in and add more shadows and highlights. Also a bit too yellow.
 I then changed nibs from .40mm to .15 and did the fine detail shading. This required far more precision than I was prepared for in terms of how finely you needed to control the spray of paint. It also kept drying up at the tip which required constant cleaning. I found that the consistency of the paint mixture was the leading cause of of my greif, too much water and it’ll just wet your model, too little water and you’ll have a clog every 20 seconds and spluttering.
Apparently you are required to have many hands for an airbrush work. I didn’t purchase an airbrush cleaning station or holder because I didn’t know what they were for at first, and I rarely saw people use them in videos. But you need one if you’re changing colours often. One thing to remember is, you can’t put down or tilt your airbrush at any point while there is paint in it or you will spill your paint everywhere as it’ll just flow over the cup. Now imagine that you had to apply thinner, water down your paint, mix it with a brush and keep your nib clean with your other hand without tilting more than 30 degrees on your airbrush hand. Not pretty. Luckily, having a 3D printer I have a solution! but more on that later.
I then changed nibs from .40mm to .15 and did the fine detail shading. This required far more precision than I was prepared for in terms of how finely you needed to control the spray of paint. It also kept drying up at the tip which required constant cleaning. I found that the consistency of the paint mixture was the leading cause of of my greif, too much water and it’ll just wet your model, too little water and you’ll have a clog every 20 seconds and spluttering.
Apparently you are required to have many hands for an airbrush work. I didn’t purchase an airbrush cleaning station or holder because I didn’t know what they were for at first, and I rarely saw people use them in videos. But you need one if you’re changing colours often. One thing to remember is, you can’t put down or tilt your airbrush at any point while there is paint in it or you will spill your paint everywhere as it’ll just flow over the cup. Now imagine that you had to apply thinner, water down your paint, mix it with a brush and keep your nib clean with your other hand without tilting more than 30 degrees on your airbrush hand. Not pretty. Luckily, having a 3D printer I have a solution! but more on that later.
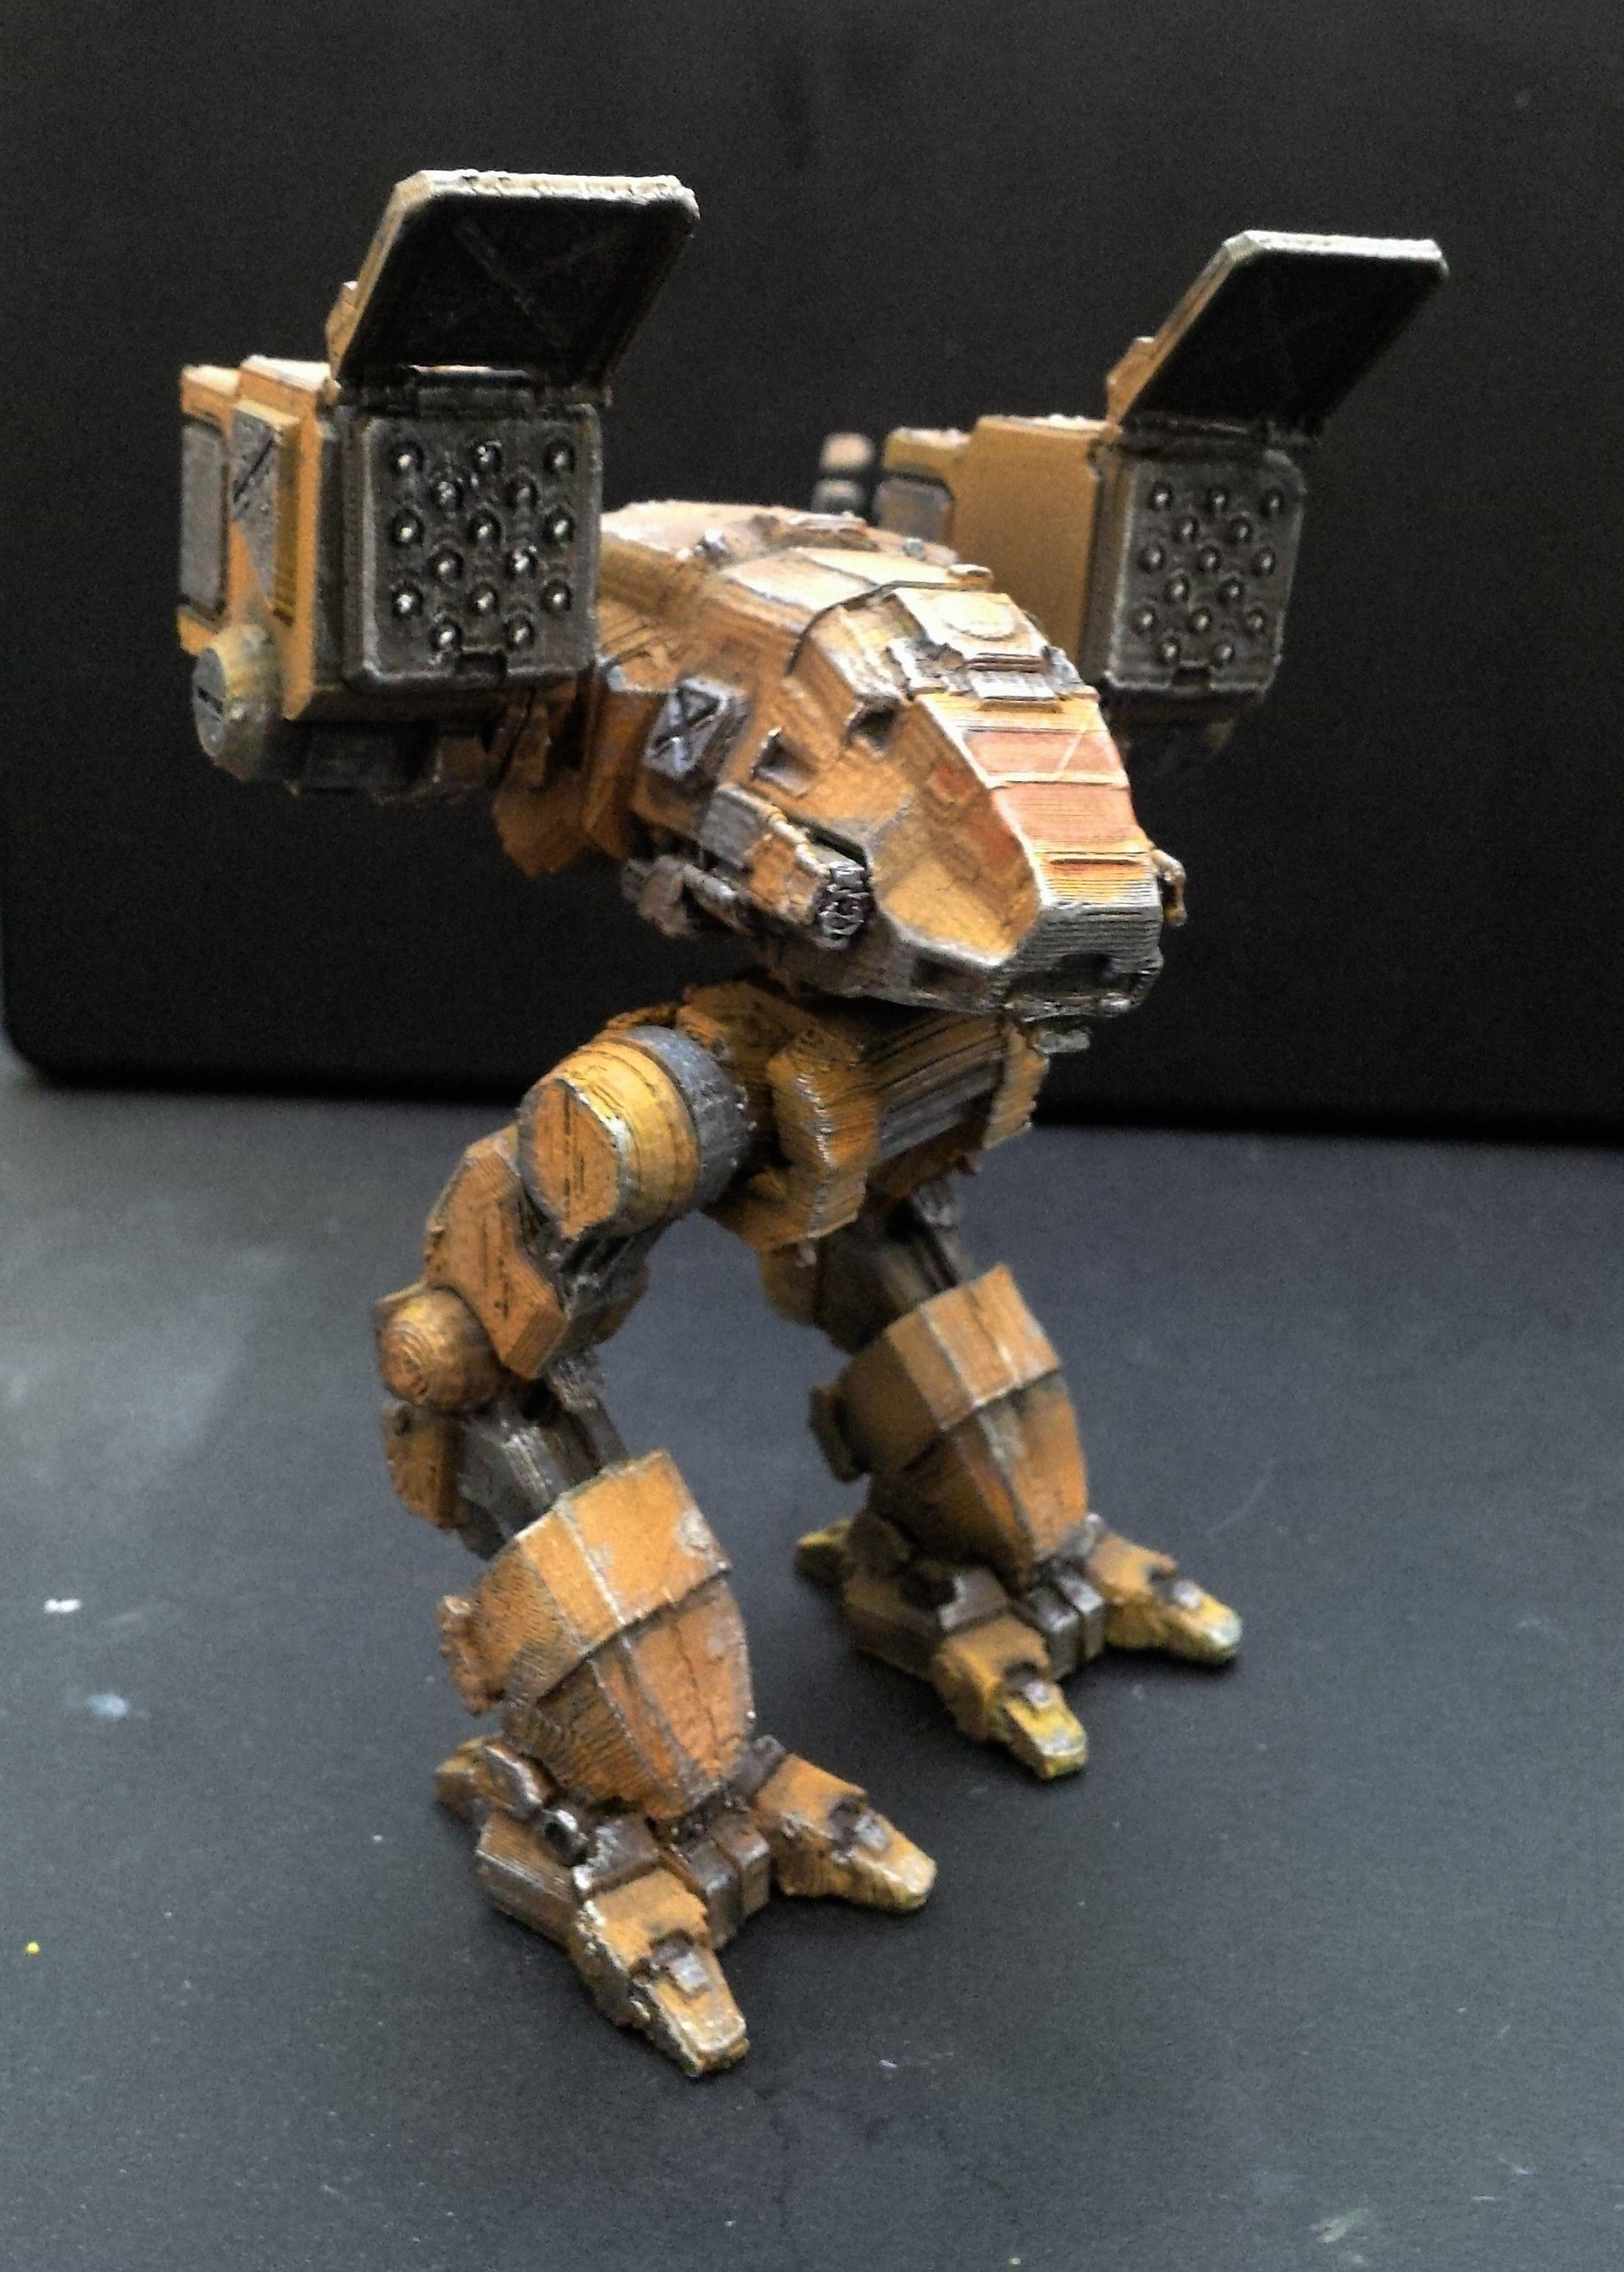 Finally, I apply the secondary colour with a brush (the grey pieces) so it doesn’t look so monochromatic, and apply some silver on the edges so it looks worn.


 And there we have it! I was quite happy with the result. The airbrush definitely sped up the process, and made it overall more enjoyable. Gradients were far easier to achieve, and the best part is the paint dries almost instantly in a relatively durable finish. There is quite a dramatic shift in the sequence of how to approach the paintjob though compared to traditional brushed on paints. Instead of going base -> shadows -> highlights -> details you’re doing Highlights/shadows -> masking -> base colour -> details.
Another thing to note is that cleanup is a bit more involved than just washing your brushes and cleaning out your palette and water. You need to purge the thing like 4 times per colour during use, clean the needle which is super delicate and get rid of any paint buildup where there shouldn’t be. A bit intimidating at first.
As my first airbrushed 3d printed model, I think it was a success. Everything adhered properly, nothing broke/exploded, and I’m only marginally paint covered.
And there we have it! I was quite happy with the result. The airbrush definitely sped up the process, and made it overall more enjoyable. Gradients were far easier to achieve, and the best part is the paint dries almost instantly in a relatively durable finish. There is quite a dramatic shift in the sequence of how to approach the paintjob though compared to traditional brushed on paints. Instead of going base -> shadows -> highlights -> details you’re doing Highlights/shadows -> masking -> base colour -> details.
Another thing to note is that cleanup is a bit more involved than just washing your brushes and cleaning out your palette and water. You need to purge the thing like 4 times per colour during use, clean the needle which is super delicate and get rid of any paint buildup where there shouldn’t be. A bit intimidating at first.
As my first airbrushed 3d printed model, I think it was a success. Everything adhered properly, nothing broke/exploded, and I’m only marginally paint covered.
You must log in to post a comment.